Showing posts with label Easter. Show all posts

Friday, March 1, 2013

Spread the Love!

Hi friends!  This week, Clear and Simple Stamps is hosting a fun linky party and I wanted to make sure I submitted a project!  The idea behind their challenge is to make a card or project inspired by your "blog crush."  

My crush is easily Kerry from www.kerryspapercrafts.com.  I stumbled across her blog a couple of years ago when I did a search for craft fair projects, and her blog was just chock full of them!  She has a really cute and fun style and had so many different items to sell.  She also makes video tutorials, which makes it really easy to borrow her ideas!  The thing I really admire about Kerry is that she doesn't seem to hoard product like I do.  LOL!  Her craft fair tables are always so attractive and enticing, and that makes me push myself to try and create items that people can't say no to.  LOVE her stuff!  :D

The other half of the C&SS challenge was to use one of their fun color schemes.   I chose to work with this one:
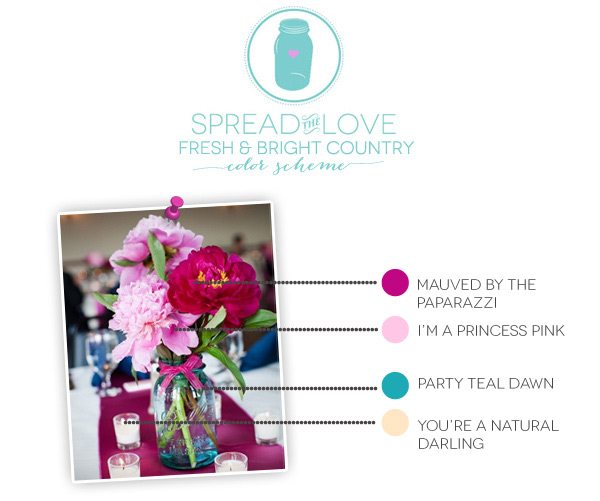

With the color scheme and Kerry's blog as inspiration, I decided to make a few fun sets of colorful clips:


They were really easy to make and came together pretty quickly!  I started off by covering some clothespins with patterned paper from My Mind's Eye (Lime Twist: Happy Go Lucky).  The part that takes the longest is sanding the paper to the clothespin, but that process really makes the clips look polished.  


Next I started working on the toppers, which is where my C&SS supplies came in really handy!  I used the largest die from Toppers and stamped it with the polka dots in Toppers Fillers.  The chocolate bunny outline and filler are from (retired) Easter Basket and Best Bunnies.  For the finishing touch, I die-cut some banners from Favor Flags and stamped the sentiment from Easter Basket.


Because I didn't have to do any coloring, all three toppers probably only took about 15 minutes to create.  LOVE when mass-producing goes quickly!  :D  I think the clear plastic bags I used are 3" x 4" and topper measures 1.5" x 3".  I also want to note how cheap the clothespins are- I get mine at the dollar store (36 in a pack)!  :)

I hope you enjoyed my craft-fair inspired project today!  If you're interested in linking up, you have until 9 a.m. tomorrow.  Visit Amber's blog for more details (and inspiration!).

Thanks for stopping by!
-Suzanne :O )


Tuesday, April 3, 2012

Bunny Tails


Hi everyone!  My aunt sent me a project via pinterest last week and I knew right away it was going to be my co-workers' Easter treat!  This is the original post:  http://pinterest.com/pin/267471665339367891/

My take on it includes a Paper Smooches bunny and their alphabet set.  I die-cut a grand Nestabilties Label 1 and folded it in half to make the topper.  I added a ribbon slider with sheer purple ribbon and stuck the bunny on with some foam tape.  A little Copic coloring and I was all set!  Here's a close up:


I used a 4x6 clear bag to package the donuts- all in all, a very quick and CUTE project!  I hope you get a kick out of these!  :D


Thanks for stopping by!
-Suzanne :O )
Posted by Picasa

Sunday, March 25, 2012

Dino-Mite Easter


Hi everyone!  It's time for my 2 Cute Ink post- check out details on the DT blog!


Thanks for stopping by!
-Suzanne :O )
Posted by Picasa

Tuesday, March 20, 2012

2 Cute Easter Bunny

Hi everyone!  We're starting up again with the 2 Cute Ink challenges!  To celebrate, Heidi's giving away this adorable bunny, so head on over to the 2 Cute Ink Design Team blog for full details!  The challenge is to make an Easter/Spring themed card.  My card uses an old DCWV card (with the pattern already on it!), a vellum sentiment from Joann's, and my trusty Copic markers.  


Make sure you head over to the DT blog to see the other designers' cards, too!  Thanks for stopping by!


-Suzanne :O )
Posted by Picasa

Sunday, April 24, 2011

Easter Parade of Cards, 2011

Happy Easter, everyone!  Below are the rest of the Easter cards I made this year.  I used lots of scraps, some more Cosmo Cricket Honey Pie papers, and my new shaker pouches from Impression Obsession (finally found a use for the confetti and seed beads I didn't know what to do with!).  I hope you enjoy my cards and have yourself a lovely Easter!


-Suzanne :O )


PS-  Stay tuned this week for my carrot cake in a jar project!  :D


Posted by Picasa

Thursday, April 21, 2011

Carrot Cake Cupcakes

Hi friends!  I've been going through the older pictures on my camera, and I found these goodies from last year.  I had picked up a package of bunny/egg cupcake picks and liners at Walmart the year before last for something like 24 cents.  I love getting steals like that and then saving them for the next year!  ;)  I made up a batch of carrot cake cupcakes and iced them with my homemade cream cheese frosting.  


I had also picked up these treat boxes at a card store; I think they were about a dollar for 3 boxes- another one of my snatch and save purchases!  :)  I wanted to give each of my co-workers a few cupcakes, and if I recall correctly, each box held 3 cupcakes- not too many, not too few.  Here are the front, side and back views (aren't they super cute!?):


Stay tuned- I have another project involving carrot cake that I'm giving my co-workers for this year.  I hope you enjoyed my little goodie boxes, thanks for stopping by!

-Suzanne :O )


Posted by Picasa

Monday, April 18, 2011

Butterfly catching


Hi everyone!  Happy Monday!  Time for another Woodware challenge!  This week we were asked to use die-cuts and/or punches, so I whipped out my fabulous new stamp set from scrappingstamping.com:

These stamps coordinate perfectly with certain Nestabilities and have just about every occasion covered in the sentiments!  I paired the sentiment with Teddy (from Ted in the Garden) and colored him in with my Copics.  Ted and his mat were cut out with the same Nestability as my sentiment.  The patterned papers are DCWV and the pink and blue cardstocks were in my scrap stash; the pink cardstock border was created with a Fiskars punch.  For a final touch, I added some purple gems to balance out the other colors.  I hope you'll have some time to play along with us this week, we'd love to see what you can do with die-cuts and punches!  Here's the link:


Thanks for stopping by, have a great Monday!

-Suzanne :O )


Posted by Picasa

Wednesday, April 13, 2011

HoneyPOP Easter!


Hi there!  I'm very excited to share this card with you, as I've not seen any products like it before (you'll see what I mean in a minute!).  For the front of the card, I used some pastel cardstock scraps and patterned paper by DCWV.  I ran the purple cardstock through my Cuttlebug and lightly scrubbed it with some darker purple chalk ink to accentuate the polka dots.  For the focal point, I lined the two images up so it looked like the bunny was leaning against the carrot (this is why I prefer clear stamps!).  I used my Copics and added a bunch of craft floss for the top of the carrot.  To do this, I wound the floss around my fingers several times, then tied it in the middle so it looked like a figure 8.  Then I cut the loop on one side and on the other end, I cut just below where I had tied it off.  Then it made a nice poofy bunch of strands, which I adhered with a glue dot.  To finish off my card, I added some American Crafts ribbon and stamped the sentiment with some Memento ink.


To see why I'm so excited about this stamp set, let me show you the inside of the card!  :)


Ta-da!  The HoneyPOP line of Inky Antics stamps are specially designed to work with honeycomb paper.  I was lucky enough to win the stamp set and a pad of orange paper on the Inky Antics blog, but now I need to get the other sets/pads!  :D  You can see a video on the Inky Antics website that demonstrates how to do the honeycomb piece, and you can also see the other stamp sets:


I added the other half of my floss bunch to the top of my carrot, but now I'm wishing I had added more floss. I'll probably go back and fix that, but you get the idea.  If I had had the green honeycomb pad, I would have used the coordinating stamp, but for now, I think the floss works just fine.  :)  I have to practice a little more with the placement of the images and the honeycomb piece, but this card was SO much fun to make! I hope you like it as much as I do.. thanks for "popping" by!  ;)

-Suzanne :O ) 

Posted by Picasa

Sunday, April 10, 2011

Vintage Easter


Hi friends!  I was lucky enough to have some crafty time this morning, so I started with the Sweet Sunday Sketch:


I knew I wanted to use the papers from Cosmo Cricket's Honey Pie collection, so I cut out one of the journaling spots (which fit perfectly with the sketch) and used that as my starting point.  I cut out the vintage-y looking bunny from my swap stash and added a little bit of coloring with my Copics.  I layered several papers and die-cut some banner pieces with my new Shapeabilities.  Instead of the star embellishments, I added a wrinkle-y ribbon bow (Martha Stewart seam binding).  I crunched up the ribbon to get more wrinkles, then tied a charm around the center knot.  To finish off the embellishment cluster, I added some mulberry roses from Michaels' Recollections line.  I *love* how the roses look.  I'll probably give this card to one of my co-workers so I don't have to worry about the card getting all smushed up in the mail.  ;)  This is a different style for me, but I really like the vintage-y look, so I'm probably going to pop out a few more cards with my Honey Pie papers.  Today I'm off to go see a high school production of Guys and Dolls, one of my favorite musicals!    Hope you've had a great weekend, thanks for stopping by!

-Suzanne :O )

Thursday, April 7, 2011

Carrot Car


Hi friends!  It's been a little while since I've had time to play along with TCP Tuesday, but I made it a priority since I've missed participating!  :)  It was a color challenge this week:


I'm not sure my teal matches up quite right, but I promise it doesn't look as blue in reality.  I don't know why my camera does that.  Anyway, I used a couple of patterned papers from my scrap folder and paired them up with some yellow and teal cardstock.  I used a few images from Spring Fling to create a scene, which I don't normally do.  I really like how it came out, even though I forgot to color the blossoms on the trees!  Pretend I meant to keep them white.  ;)  Of course I used my Copics and Nestabilities, and added some buttons to finish off the sketch from SFYTT:


Okay, well there's one more Easter card down!  I have about 12 more to do, and half of those are for my mom to send out, so I have my work cut out for me!  :)  I'm going to Allentown on Saturday for a rubber stamp show, so perhaps I'll come back with some "motivation" to finish up my Easter cards!  wink wink!  Thanks for stopping by!

-Suzanne :O )


Sunday, March 20, 2011

TCP Tuesday 150


Hi everyone!  Here's my first Easter card of 2011! :)  This week, The Cat's Pajamas challenge was to use this  sketch: 

I used some DCWV patterned paper and lots of cardstock layers.  The image is so sassy, don't you love Sprinkles and her enormous Easter bonnet?!  :)  I colored her with Copics and added some pink polka dotted ribbon to match her bonnet.  I have to admit this sketch was quite a challenge since I don't have any banner dies, but I'm surprisingly pleased with the results.  I love when challenges open your eyes a bit... I never would have done a layout like this without some prompting!  :)  I hope you enjoy my Easter card, thanks for stopping by!

-Suzanne :O ) 

Posted by Picasa
Related Posts Plugin for WordPress, Blogger...