Showing posts with label clear and simple stamps. Show all posts

Friday, March 1, 2013

Spread the Love!

Hi friends!  This week, Clear and Simple Stamps is hosting a fun linky party and I wanted to make sure I submitted a project!  The idea behind their challenge is to make a card or project inspired by your "blog crush."  

My crush is easily Kerry from www.kerryspapercrafts.com.  I stumbled across her blog a couple of years ago when I did a search for craft fair projects, and her blog was just chock full of them!  She has a really cute and fun style and had so many different items to sell.  She also makes video tutorials, which makes it really easy to borrow her ideas!  The thing I really admire about Kerry is that she doesn't seem to hoard product like I do.  LOL!  Her craft fair tables are always so attractive and enticing, and that makes me push myself to try and create items that people can't say no to.  LOVE her stuff!  :D

The other half of the C&SS challenge was to use one of their fun color schemes.   I chose to work with this one:
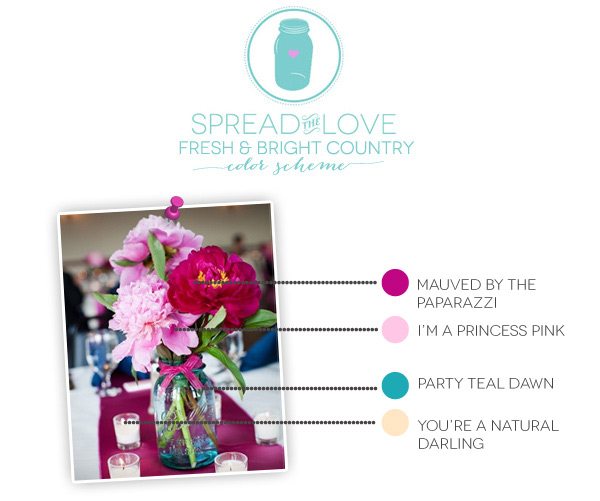

With the color scheme and Kerry's blog as inspiration, I decided to make a few fun sets of colorful clips:


They were really easy to make and came together pretty quickly!  I started off by covering some clothespins with patterned paper from My Mind's Eye (Lime Twist: Happy Go Lucky).  The part that takes the longest is sanding the paper to the clothespin, but that process really makes the clips look polished.  


Next I started working on the toppers, which is where my C&SS supplies came in really handy!  I used the largest die from Toppers and stamped it with the polka dots in Toppers Fillers.  The chocolate bunny outline and filler are from (retired) Easter Basket and Best Bunnies.  For the finishing touch, I die-cut some banners from Favor Flags and stamped the sentiment from Easter Basket.


Because I didn't have to do any coloring, all three toppers probably only took about 15 minutes to create.  LOVE when mass-producing goes quickly!  :D  I think the clear plastic bags I used are 3" x 4" and topper measures 1.5" x 3".  I also want to note how cheap the clothespins are- I get mine at the dollar store (36 in a pack)!  :)

I hope you enjoyed my craft-fair inspired project today!  If you're interested in linking up, you have until 9 a.m. tomorrow.  Visit Amber's blog for more details (and inspiration!).

Thanks for stopping by!
-Suzanne :O )


Tuesday, January 29, 2013

A Gift for Grandpa


Hi friends!  Tomorrow at work we're having a grandpa shower for our school social worker who just had his first grandchild a couple of weeks ago.  I got him a picture frame and a book, so I thought it would be cute to package them in a handmade bag.  (I had a little trouble getting the bag in my light box, so please excuse the picture!)  I used an 8" x 10" bag and adhered a piece of DCWV patterned paper.  I added an old chipboard giraffe from Basic Grey and thought about adding more embellishments, but decided to make a tag to fill the space instead.


I die-cut the larger tag from Clear and Simple Stamps (Tags 1) and stamped a tag outline from Trendy Tags.  The wagon, stack of presents and sentiment were stamped from Cart Pals: Baby.  I wanted to keep everything from getting too frilly because I'm giving it to an adult male (but this was tricky because the baby is a girl!  LOL).


Of course I needed to make a card to go with the gift, so I used a scrap from the same DCWV paper and used a focal piece I had made for a previous card, but ended up not using.  To finish off the card I added some old chipboard from Colorbok.  I hope you like my little gift ensemble, thanks so much for stopping by!

-Suzanne :O )

Sunday, January 27, 2013

Money Holder


Hi there!  The pictures above are of a money holder I made last summer for my boyfriend's brother.  There was a last-minute scramble to come up with a gift, so I told my boyfriend he could just give cash and I would make it look pretty.  :)  Because we were in a rush, I don't think this is my best work, but I still wanted to share the idea.  

I started off with a bunch of supplies by Clear and Simple Stamps and some papers by K & Co.  The tri-fold card was made from this die:


As you can see, the die comes with that swirly shape, so I cut out some orange cardstock, stamped the robot from the set below in orange ink, and trimmed it out:


I stapled a scrap of ribbon and stamped a sentiment from the same set on the orange cardstock; the banner sentiment is from this set:


On the inside, I used another scrap of the blue polka dot paper that was used on the banner and stamped the sentiment from a retired set called Celebrate.  I glued the strip of paper down on the sides and bottom so I could stick in the money in on top.  I used a lot of different sets to pull this together, but this could easily be mass-produced or used for gift cards!  I hope you like my project, thanks for stopping by!

-Suzanne :O )


Posted by Picasa

Friday, January 25, 2013

Congratulations (New Principal)


Hi there!  Today's card is a simple one- you can see I didn't even color the image!  I made this for my mom's goddaughter, who became a principal last summer.  I thought it would be cute to use a school-themed image, so I used this one by Stampin' Up! and just stamped it in brown to keep it looking vintage-y.  I think I got the apple paper in a swap, so I'm not sure who manufactured it, but the green hexagons are K & Co.  The sentiment is Clear and Simple Stamps.

I hope you like my creation, thanks so much for stopping by!

-Suzanne :O )
Posted by Picasa

Monday, January 21, 2013

Doodlebug Cherries


Hi friends!  Just popping in real quick to share a set of cards I made for my Etsy shop!  I really like how these cuties turned out!  The inspiration came to me when I was straightening out some of the embellishments in my stash yesterday, and I came across these cherry brads from Doodlebug.  This morning, I saw the Clean and Simple sketch, and the cherry brads popped right back into my brain and I knew I had to make a set of cards based off the sketch:


I went through my 6x6 pads and pulled out some papers from different Lime Twist collections by My Mind's Eye.  I combined some sentiments from Paper Smooches stamps and die-cut the banner with a Clear and Simple Stamps die.  I think the pink cardstock is from Michaels but the brown is Dark Chocolate from Papertrey Ink.


That about sums up this set... it's still available for sale if you're interested!  :)  Hope you enjoy it, thanks for stopping by!

-Suzanne :O )

Friday, January 18, 2013

It's Your Day


Hi everyone!  I made this card a while back for my brother (who's a welder) when my mom found out there was a national tradesman's day.  I found the image online, printed it out, and added the sentiment by Clear and Simple Stamps.  The papers are all A Boy's Life by Echo Park.

It's a pretty simple, but I think my brother appreciated it.  :)  I hope you like it too, despite my "cheating" by using an online image!  heh  :)  Thanks for stopping by, friends!

-Suzanne :O )

Monday, January 14, 2013

Bundle of Joy


Hi there!  Today I'm excited to share this super cute baby card I made for my friend Jen, who just had her son a few weeks ago!  I have to give a little side story first- on Saturday I got the mail and there was a package addressed to me from Clear and Simple Stamps.  I was totally perplexed because I hadn't ordered anything.  When I opened the package, there was a note saying the contents were a thank you for buying their products throughout the year- what an unexpected surprise that was!!!  Enclosed was this limited edition stamp set and coordinating die:


As soon as I saw how versatile the set was, I knew I had to put that die and "bundle of joy" sentiment to work.  I used this week's Sweet Stop sketch for the layout:


I used lots of Papertrey Ink dark chocolate cardstock and super cute papers from Doodlebug's Snips and Snails 6x6 paper pad.  I LOVE Doodlebug, they've remained one of my favorite companies since I first discovered them years ago!  :)

I stamped the sentiment on a hand-cut banner and layered it over the die-cut.  A couple of buttons draw the eye upwards and some Doodlebug twine finishes off the card.

I hope you like this card and a special thank you to Nicki and Reenee at Clear and Simple Stamps- you really made my day!!  :D

Thanks for stopping by!
-Suzanne :O )


Thursday, January 10, 2013

Baby Shower Tags


Hi there!  I've finally wrapped up sharing all of my Christmas projects, so now I'm going to start heading backwards to share the many cards/projects I made last year that never got posted.  First up are some tags I made for my friend Jen's baby shower.  The tag above is the one I put on her gift.  She lives in Seattle, but the baby shower was given here in NY, so guests were instructed to have gifts shipped to her house in Seattle, but to bring a book to the shower (to build the baby's library).  Since I was giving a book (The Polar Express, in case you're curious), I thought this sweet little moon/blanket/book image from Clear and Simple Stamps would be perfect.  I stamped it on a manilla tag and add the to/from sentiment from My Favorite Things.


This tag was just a quick way for me to show Jen what I got for her.  I made a simple pocket out of PTI aqua mist cardstock and adhered an old chipboard embellishment from K & Co.  (I don't know if you can tell what those pictures are, but I got her the accessories for her stroller- that picture peeking out is a tray).


This last tag is the one I made for my mom to give.  I've known Jen since we were in middle school, so my mom wanted to send a little something for her.  I die-cut the tag from kraft cardstock and used another to/from sentiment from My Favorite Things and a dimensional sticker from K & Co.  You can see the tag/stamp set I used here:  Tag You're It

So that's it for tonight, I hope you like my tags.  Thanks for stopping by!

-Suzanne :O )


Friday, January 4, 2013

Christmas Thank You Notes

Happy Friday, friends!  I'm back tonight to share the thank you notes I made for all of my co-workers.  I get a lot of small gifts that most people probably wouldn't send thank you notes for, but I *love* having an excuse to make lots of cards!  I usually try to attack my Christmas scrap pile each year when it comes time to make my thank you notes, and this year was no different.  I even had some old DCWV cards to finish up, which you can see in the picture above.  Because they're so glittery, I decide to keep the design simple- just some strips of cardstock and die-cuts from K & Co popped up on foam tape.  You can see a close up here:


For the next twelve cards, I cut panels of white cardstock at 3.75" x 5.25".  Then I gathered all the strips of paper from my scrap pile and tried to group similar-looking papers.  I ran some glue around the edge of the cardstock piece and adhered all of the paper strips at a diagonal (for interest).  I rounded the corners to soften the look of all those stripes and kept my layout the same as the other 5 cards.  This set of cards below uses gift embellishments by Jolee's:


Here's a close up (and my favorite card- love the pink and purple!):


The last two sets of cards use rub-ons from my stash and a sticker ("my absolute favorite!") from K & Co.  The "thank you" sentiment is Clear and Simple Stamps.  I seem to use their stamp set (various thank you greetings) for this project every year!  Love it!


I really used up a good chunk of scraps this way, and I think it gives my cards a fun, colorful vibe.  Perhaps this will inspire you to attack your scrap piles, too!  :)  Thanks for stopping by, friends.  I'll be back tomorrow to share the gifts I gave to my co-workers... stay tuned!

-Suzanne :O )


Friday, August 31, 2012

Batty for You

Hi everyone!  Just popping in to stay active with the SFYTT- don't want to miss out on the big year-end prize!  :)  Here's the sketch for this month:


Aaaand here's my interpretation!  Time to start making Halloween cards- LOVE this time of year!  :D  Orange paper is by Target, spider web paper is DCWV, and the bat tag is something I received years ago in a swap- love those googlie eyes!  :)  The sentiment is by Clear and Simple Stamps.


I'm still working like crazy to get ready for a craft fair on the 8th, so my blog posts will probably just be once a month for a while.  Thanks for stopping by, hope you like this card!

-Suzanne :O )

Wednesday, January 4, 2012

Craft Fair Merchandise: Tea Sets


Hi friends!  The next installment in the craft fair series is the tea gift set.  I found picked up several different tea pots or mug sets throughout the year with the idea that I would package them as a gift set.  I wound up with 6 different tea pots/mugs, so I bought several boxes of tea and packaged them in clear 3 x 3" boxes from Denami Design.  I wish I had remembered to take a picture of the contents before I wrapped them in cellophane, but that's what I get for crafting in a frenzy!  :)  The baskets needed a little something else, and I had originally wanted to get individually wrapped biscotti so they would stay fresh, but they were hard to find.  I did however find individually wrapped packages of vanilla wafters (about half the size of a normal package), so I wrapped some cute patterned paper around each package (you can see them peeking out if you zoom in) to dress them up.  


Of course I couldn't stop with just the contents of the basket, I had to make tags for each basket!  :)  I used various stamp sets and some kraft tags I had in my stash to add to the handmade feel.  Surprisingly, the baskets sold pretty well!  I sold them for $10 each and only had one left at the end of the season.  I gave that "you're tea-riffic" basket to my Secret Santa who is a physics teacher, so it all worked out in the end.  :)  

I'll be back tomorrow with a few more food gift ideas!  Thanks for stopping by today!

-Suzanne :O )

Posted by Picasa

Friday, December 30, 2011

Cookie Exchange/Cookies in a Jar


Hi friends!  Popping in with another post today- this one's pretty lengthy, so bear with me!!  I have a LOT to catch up on with my craft fair goodies, Christmas cards and gift packaging.  I'll start with the packaging I whipped up for my cookie exchange at work.  I made oatmeal butterscotch cookies with walnuts and used these bakery bags I had picked up at a yard sale.  We were supposed to include our recipe, so I clipped that on with a regular old paper clip and added a fun tag using some stamps by Clear & Simple Stamps.  The overall effect is a little busy, a little messy, but I really wanted to use these stamps!! LOL  The cookies I stamped on the background are from Cookie Bake:


The sentiments were stamped on some flags I die-cut with my Nestabilities and stapled onto the tags.  This was a very quick & easy project since I was in a rush (every year I always think I'm going to *make* time for things like this, but it never seems to happen the way I plan! lol).  I also have the Cookie Bake Extras set which came in handy for my cookies in a jar:


I made up 5 different jar recipes and sold them for $7 each at my craft fairs.  I made 15 jars all together and had 6 left over at the end of the season.  Luckily, Chris had 5 co-workers he wanted to give gifts to, and the last remaining jar went to his mother as a hostess gift on Christmas Eve.  I was worried that I would have a ton of food items left over from my craft fairs, but everything that didn't sell eventually found a home (you'll see as I keep posting what else I made).  ;)  Anyway, onto the jars and their tags!


The pic above shows 4 of the varieties, and the picture below shows the 5th on its own display:


I guess I remembered to put the flash on in the picture below, and you can see a peek of my cake in a cup mixes to the left:


Here's a close up of the tag; you can see how I used the cookie words stamp to make a background.  The pocket for the recipe was made out of kraft cardstock, and I believe the dimensions were 4" x 9", scored at 3".  I used some staples at the top and printed the recipe and the name of the mix from my computer.


I realized too late that I probably should have taken a side view of the jars so you could see how the layers looked, but you get the idea.  :)  It was a bit of work to make these, but my customers and Chris's employees really seemed to like them!  Thanks so much for sticking through this long post!

-Suzanne :O )


Posted by Picasa

Monday, October 24, 2011

from your favorite little pumpkin


Hi friends!  Here's a Halloween card I did *not* make for any design teams!  :)  This one I'm entering in the CAS-ual Fridays challenge (to use any medium to color your image).  I discovered this challenge because Clear & Simple Stamps is sponsoring, so I figured it would be a good time to ink up one of my C&SS stamp sets!  This set is called "Pumpkin Patch" and comes with a bunch of different jack-o-lantern faces.  I chose the face I liked best and colored the pumpkin with my Copics.  I cut it out and set it aside.  Next, I cut a scrap of (glossy) orange paper with my Nestabilities and outlined the inside of the die with a black Sharpie.  I stamped the sentiment on a scrap of kraft cardstock and added my jack-o-lantern with foam tape.  To keep the card simple, I only added two lime green gems.  I usually go cute and colorful, but I like how clean this card turned out.  I hope you enjoy my clean and simple card!  Thanks so much for stopping by!


-Suzanne :O )
Posted by Picasa

Sunday, August 7, 2011

Friends make life a little sweeter


Hi all!  I'm back again to share some more exciting news- I made the design team for 2 Cute Rubber Stamps!!  Heidi's images are adorable, and I am so honored that she chose me to be a part of her team!  This little cutie above is called "Penguin Fun" and you can purchase him as a digital image in her Etsy shop.  I have him in rubber but I don't know if there are any left.  I wanted to play along with the most recent challenge at 2 Cute Rubber Stamps, to use this picture as inspiration:


I really loved the purples, blues and greens, so I used lots of scraps with those colors, and a pop of yellow (seen in the light fixture).  I colored Mr. Penguin with my Copics and used a sentiment by Clear & Simple Stamps.  The rectangle, scalloped rectangle and grommet tag are all Nestabilities/Shapeabilities.  The sketch is this month's SFYTT:


I added a couple of glitter brads by Making Memories but otherwise let the patterns in the papers provide interest.  I hope you like this card and you'll be seeing lots of other super cute images when I post on Sundays. :D Thanks for stopping by!

-Suzanne :O )

Posted by Picasa
Related Posts Plugin for WordPress, Blogger...