skip to main |
skip to sidebar


Hi everyone! First of all, Happy Halloween! I'm super excited about this post because I worked really hard on it and I LOVE how it turned out :D I made this little game for my brother's god-daughter (my god-niece, if you will) who just turned 3. I started this project before I started working in mid-September, so I was really ahead of the game, which is unusual for me. I was able to do the project in a couple of hours because it was super easy- yessssssss! :) I used a Marvy Uchida 2" scalloped circle punch, and a 1 1/2" circle punch from EK Success to make the bases for the playing pieces, and then I used bits and scraps of various embellishments to make the "matches". I had so much fun, I almost didn't want to stop at 24 pieces, but I figured that was enough of a challenge for a 3 year old- LOL! True to my character, I waited until the last minute to decorate the "box"- (an old Altoid tin) and so it didn't really turn out how I wanted it to. I would have painted it black if I had had more time, but my mom wanted to get Kylie's package in the mail. Maybe some day I'll learn not to procrastinate! ;) The best part about this whole project though was Kylie calling the other day to say "I love my memory game! Thank you soooo much! It's AWEsome! An' I found alllll de MAT-ches!" :D :D :D It totally made my day, she's such a cutie! Anyway, I hope you all enjoy my memory game and had a happy Halloween! :D Thanks for stopping by!
-Suzanne :O )

 Hi everyone! A quick post tonight- these are the recipe cards I made for Heidi's swap on the PCMB. The checkered paper is Making Memories, the purple is by DCWV and the bone die-cuts are by K&Company. The polka dot paper I got in a swap and my mom had the gold brads sitting around in a drawer in my kitchen- how dare she hold out on me?! :D The stamp is by Stampin' Up! which I colored with watercolor pencils. I'm not too thrilled with how that came out- if I had it to do over again I would have stamped/colored on white paper and cut the image out. I added little googlie eyes to the frog (if I was in that "stew" my eyes would probably roll too! ;)) and used a scalloped square punch by EK Success. I love doing layouts like this because it helps me use up my patterned papers- yesssss! Anyway, I hope you enjoy, even though the recipe sounds so disgusting! :D Thanks for stopping by!-Suzanne :O )
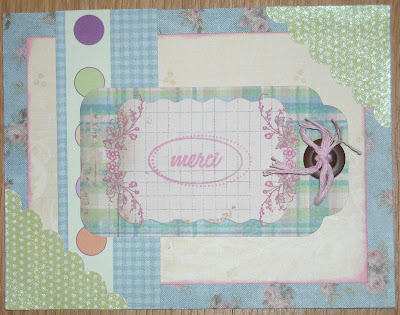
 Hi everyone! This is one of my first attempts at the "shabby chic" look. I got the blue/pink roses paper from my super thoughtful and generous aunt who sent me a box full of scrapbooking goodies she got at a yard sale. That paper and the blue plaid paper are Daisy D's and the cream swirls paper is by K&Co. The green photo corners and tag are by Making Memories. I'm not sure who made the paper ribbon (multi-colored circles)- I got it at a scrapbooking yard sale sponsored by my LSS, but there was no label on it. I used a stamp by Fiskars (birthday gift from my boyfriend :) ) and stamped it with some pink chalk ink by Colorbox. I'm not really a huge fan of tying thread through button holes- this was the first time I did it, and it was more effort than I like to put into my cards, so I'm not sure I'll keep doing it, but I'm glad I tried it. Anyway, I really like how all the different elements came together on this card. This really isn't my style, but it's so pretty and I just might have to keep dabbling! :) I hope you enjoy my efforts; thanks for stopping by!
-Suzanne :O )

Hi everyone! Someone sent me this bag of leaves and the chipboard letters in a swap, so I had to put them right to good use! This isn't my best card, but I do enjoy the embellishments :) The autumn words and green papers are by DCWV, the striped paper is Daisy D's, and the yellow paper I got at the dollar store (Elizabeth something?). The brads are from Target and the "beautiful" is actually a button I got in a grab bag from Michael's. Anyway, I just wanted to share a quick card, thanks for stopping by!
-Suzanne :O )

Hi everyone! This is a thank you card I made for my boyfriend- I wanted to keep it masculine but decided to go for a fall theme as well. I made the apple tag last year at a make-n-take, so I worked off of the color scheme of the striped paper. The maroon paper is DCWV and the beige spotted paper is by Debbie Mumm. The olive green ribbon (doesn't look olive green here, but shiny ribbon doesn't photograph well for me) I got at Target- 3 yards for 16 cents. That's right, 16 cents! It was on clearance; I have no idea why, but I snatched it up. :D My favorite part about this card are the cork dots. I saw them in the dollar store a while ago and thought I could use them somehow- so here's the "somehow"! :) They're self adhesive, which is super awesome, and I think they really mesh well with the autumn/earthy theme. Plus, they add a fun texture to the card. The only thing I would change about this card is inking the edge of the apples, but I wasn't able to when I made the tag. Oh well.. I like this card just the same, and I hope you do too! Thanks for stopping by!
-Suzanne :O )
 Hi everyone! I'm really excited about this card. I borrowed the layout from Kim Kesti, one of the professionals at Paper Crafts. I have a tough time with layouts... I have SO much patterned paper, but I never get to show it off with the way I normally design my cards. This layout is perfect for using multiple papers and getting to show each of them off a bit! The Halloween words and green swirls papers are from Target (love their dollar spot!) and the pumpkin paper I received in a swap. The stamps (cat, sentiment) are from Hero Arts- I just picked up this set at my local scrapbook store and I LOVE IT!!! It's so cute, especially since the cat reminds me of my old buddy Puff. He has since passed on, but I couldn't help but color this image with gray. :) I pulled out some scalloped punches from Marvy Uchida (2" & 3") and a corner rounder by EK Success. I used some Tangerine chalk ink by ColorBox and a bit of chipboard. I really like the look of "naked" chipboard... its earthiness seems appropriate on fall cards. I colored the image with dry watercolor pencils, and then used a Q-tip to wet the image. I'm really pleased with how this card turned out, and that's mostly due to the layout, so if you read this, Kim- thank you for the inspiration! :D I hope you all enjoy this card, and thanks for stopping by!
-Suzanne :O )


+of+use+it+challenges+blog+badge2_1.jpg)


.jpg)


