Tuesday, June 28, 2011

Your birthday popped up!


Hi everyone!  Just a quick and simple card to share with you today.  A while back I had hosted a swap for making focal pieces and this popcorn image was my submission (with the black mat).  I used a stamp set by Clear & Simple Stamps called Bucket-o-Popcorn fun which I love because you can fill in the oval with whatever sentiment fits the theme of your card!  :)  There's also a coordinating set called Popcorn Extras:


Fun, right??  :)  I colored the image with my Copics and used ColorBox mint ink for the sentiments.  


Since my focal piece had been made already, all I had to do to make this card was emboss some red cardstock and mat it on a piece of black cardstock.  It was so fast and easy- this card took less than five minutes!  Now I just need to find time to make more focal pieces!  ;)  I used this card for my cousin, who just turned 21.  It's hard for me to make cards for men around that age- I try to stay from anything too cutesy, but I can't help using puns!  :)  I hope you enjoy my calorie-free card, thanks for stopping by!


-Suzanne :O )
Posted by Picasa

Monday, June 27, 2011

Fourth of July Parade


Hi everyone!  Here's my take on the Woodware USA Red, White, and Blue challenge!  I think I'm actually on time with my Fourth of July cards this year and this one is the last of 'em!  I just got my Clowning Around set in the mail last week and I couldn't wait to get it inky!  I knew I wanted to use a clown wearing patriotic colors, but when I went through my Hobby Lobby chipboard and saw the "Fourth of July parade" sentiment, the card just came together!    Don't you love when that happens?!  :)  I used lots of scraps and this sketch for my layout:


Of course I colored my clown friend with my Copics and then I added a punched star and a  chipboard star to finish the layout.  I really hope you'll have some time to play along with our challenge, and if not, just to take a look at the DT samples!  There's a lot you can do with Red, White and Blue!  :D


Thanks so much for stopping by!


Suzanne :O )

Saturday, June 25, 2011

Land of the Free


Hi there!  Sorry it's been a while since my last post- we had graduation at school so it's been a very hectic week!  Glad that's over- I hate those days where I have to leave work, go home with just enough time to change, grab something to eat, and then head back to work (graduation, open house, scholarship ceremony, etc)!  Anyway, onto my card for today... I made this last week but didn't have time to post it for the Sweet Sunday sketch:


I turned the sketch on its side so I could use my new admission tickets!  I've sold a few but still have plenty left in my Etsy shop if you're interested!  


I matted the tickets with some glittered polka dot red patterned paper from Target and cut it into a banner shape.  The chipboard sentiment piece is from Hobby Lobby- love that subtle design with the polka dots and stars!  I cut out the red patterned paper (K & Co.) and white cardstock with my Nestabilities and added some sparkly gem brads from my stash.  Here's a different angle of the card where you can see the different colored blue gems and a better view of the glitter on the polka dots behind the tickets:


The light blue cardstock was embossed and sanded, and matted on dark blue cardstock. I like how this card turned out, although it doesn't have any images.  I love using up my stash too, like those gem brads! :D  I hope you're having a fabulous weekend!  Not sure what I'm doing with myself yet, but I hope to enjoy the sun after several crummy, gloomy, rainy days!  Thanks for stopping by!


-Suzanne :O )
Posted by Picasa

Monday, June 20, 2011

Enjoy the little things


Happy Monday, friends!  Our Woodware assignment this week was to use the following sketch designed by our very talented Kerry!:


My card is pretty simple- I used lots of cardstock and patterned paper scraps and my Fiskars border punch to match Kerry's layout.  I stamped the flower pot from Garden Greetings three times and stamped the sentiment right below them.  I added the bee to keep things from being too symmetrical (plus he's cute!).  I colored the image with my Copics and added a shadow to ground the flower pots.  I wish I had used my normal white cardstock instead of a scrap because my colors bled a little bit (you can see it in the bee, especially) but I don't think it's too noticeable.  

I hope you'll have some time to play along with Kerry's sketch, we'd love to see your interpretation!  Link up here:


Thanks for stopping by, have a great day!
-Suzanne :O )

Sunday, June 19, 2011

You are too kind


Hi everyone!  I hope you're all having a great weekend!  The weather has been sunny and mid-80's- just really summery the past couple of days!  Yesterday I chaperoned a class trip for the freshmen and sophomores to Six Flags Great Adventure and we had a really fun time!  It was so nice to walk around the park, go on a couple of (water) rides, hang out with the other chaperones and eat lots of junk food!  :)  Today starts the first day I'm cat-sitting for my friend (I brought Napoleon back to my house) and he has been such a hoot!  He's a very entertaining little guy, so I'm sure I'll enjoy having him here this week.  Needless to say it's been a busy weekend, but I wanted to share this card with you before my family and I take my dad out for Father's Day dinner!  


Clear and Simple Stamps is hosting a challenge this month based on this collage:


I was inspired by the color combination in the bottom middle photo, so I pulled out various inks and my C&SS "Best Bunnies" set and got down to stamping.  I used the sketch from last week's Clean and Simple blog:


I used my Fiskars border punch, some red and kraft cardstock and a few gems to finish off my card.  There's a white border around the kraft, but it's hard to tell in the photo.  This card was so much fun to make- I don't usually stamp my own patterned paper, but I love the clean and bold look of this card.  I hope you do too, thanks for stopping by!

-Suzanne :O )


Posted by Picasa

Thursday, June 16, 2011

Love Always


Hi friends!  I made this card for my aunt & uncle's anniversary and to get myself started I thought I'd try my hand at Embellish Magazine's Color Trends Challenge.  Background stamping was also part of the challenge:


I knew I wanted to use that cute little image from Crafty Secrets, and since the image itself is vintage-y, I let that lead the rest of my card.  I used a Glitz background image on some taupe cardstock and stamped the script several times with Versamark ink.  I heat embossed it with clear powder for a tone-on-tone look.  I layered that piece on some blue cardstock (not exactly the shade in the challenge, but it was the closest I could come).  Next up I cut some green cardstock and actual vintage piano music for the next panel.  I roughed up the edges of the paper which started to look worn with hardly any effort!  :)  My image was colored with Copics and cut out with my Nestabilities; I traced the Nestie shape on orange cardstock and cut it out with my scissors.  I'm really loving the matting with this technique.  I've always been using the next size shape to mat my images, but they're too big and not always proportional.  The tracing technique makes me very happy.  :)  

Speaking of, I did the same thing for my sentiment treatment.  I threaded some vintage lace through my ribbon slider and stamped it with a Hero Arts sentiment.  Blue cardstock was added behind the slider to pull the card together and differentiate the slider from the similar tones in the image and sheet music.  To finish off my card, I added some orange buttons by Basic Grey.  I should mention that the layout is courtesy of this week's Sweet Stop Sketch:


This card isn't my usual "cutesy" style, but I'm pleasantly surprised with how it turned out.  :)  Thanks for stopping by!

-Suzanne :O )


Posted by Picasa

Tuesday, June 14, 2011

You take the cake!


Hi friends!  Just a quick post today.. here's another card using MME's Quite Contrary papers.  I paired them up with some turquoise (trust me it's not the blue it looks like!) cardstock and an image by Sweet n Sassy stamps.  I colored Cocoa and the piece of cake he's just "guarding" with my copics and cut him out with my Nesties.  The sentiment is also Sweet n Sassy and the sketch was from an old sketch challenge:


I hope you enjoy this card, thanks for stopping by!

-Suzanne :O )

Posted by Picasa

Monday, June 13, 2011

Ted's Pretty Present


Happy Monday everyone!  It's time for another Woodware challenge; this week we are sharing our birthday cards!  We'd love to have you join along, so make sure you link up at the end of my post.  For my card, I used this week's Card Patterns Sketch:


I haven't played along with CP in a loooong time, but as soon as I saw this sketch I knew it would fit my little buddy Ted perfectly.  I grabbed my MME Quite Contrary 6x6 pad (it came free in one of those British mags- LOVE that!) and some white and kraft cardstock and got down to cutting.  I know I used that Labels 18 die on my last Woodware card, but when I was playing around with it, I realized it would make for a great background too, not just a focal piece.  I stamped Teddy several times on scraps to make his gift extra snazzy.  Martha Stewart has nothing on Ted.  ;)  After coloring Ted with my copics and paper piecing the present, I added a brad to the flower to make a dimensional bud.  To finish off the card, I ran a strip of kraft cardstock through my Cuttlebug and added two large Denami Design buttons to complete the sketch.  I wanted to add a sentiment but it just didn't look right no matter where I placed it, so I left it blank.  I think the pretty patterned papers hold their own without a sentiment.  :)

Again, I hope you'll have some birthday cards to share with us.  Play along here:


Have a great week, friends!
-Suzanne :O )

Posted by Picasa

Sunday, June 12, 2011

there's no tie


Hi friends!  I can't believe I'm actually ahead of the game with my father's day card, but here it is!  I used this week's Mojo Monday Sketch, which was quite a challenge will all those pieces, but I'm glad I took it on.
I started out with lots of scraps from MME's Lime Twist (Out of the Blue) collection.  I cut the scraps into strips and then die-cut circles from the end of the strips to make the scallops.  The image is by Penny Black, and as soon as I saw that little guy in the set, I knew he would make for a cute father's day card.  I didn't have the sentiment I wanted, so I picked up an alphabet set by Studio G for $1 and made my own.  I don't usually like to do that because it's time consuming, but I figured it might be a good idea to have an alphabet stamp on hand for times like this.  :)  


I added some warm brown gems to balance out the card since I realized afterwards I probably should have put the sentiment to the right side of the card.  The inside of the card has more scraps which I die-cut with my Nesties and added a sentiment by Studio G.  

I hope my dad likes this card... he's always been into dog shows even though we haven't had a dog in our house for almost 30 years, so I think this card will be up his alley.  It's a little cutesy, but that's my style- I think masculine cards will always be tough for me that way!  

Thanks for stopping by, I hope you enjoy the rest of your weekend!

-Suzanne :O )

Posted by Picasa

Saturday, June 11, 2011

new in my etsy shop...


Hi friends!  I bought a roll of admission tickets and I'll never be able to use them all, so I'm putting some up for sale!  Check out my etsy store if you're interested.  You'll be seeing lots of these tickets on my Fourth of July cards; stay tuned for some inspiration!  :D

-Suzanne :O )

Friday, June 10, 2011

Stack of Chubby Chums!


Hi there!  Just poppin' in to share the birthday card I made for Chris a couple of weeks ago.  I used Paper Smooches' Chubby Chums set and colored the chums with my copics.  Then I cut them out and stacked them on top of each other in order of weight.  The festive papers are DCWV's The Celebration Stack and the sentiment was pieced together from Chubby Chums and Sentiment Samples.  I also added some brads from my stash, but all together, it was a pretty simple card!  The stamps are so darn cute that I wanted them to take center stage.  :)  I hope you're having a great Friday, thanks for stopping by!


-Suzanne :O )
Posted by Picasa

Thursday, June 9, 2011

Rock-a-bye baby


Hi friends!  It's been a wicked week at work (end of the year in the Guidance Office is always super busy!) so I didn't get to post as much as I wanted to.  I made this for a friend who ordered a baby shower card so I pulled out my baby supplies basket and got to work.  I started with an Inky Antics image- this actually came in a set with the sick turtle that you saw in my nursing home card kits but I thought it would be great for a shower card, too! :)  I used this week's Sweet Stop sketch for the layout:


I flipped pieces around a little bit when I found the rock-a-bye baby sentiment.  It's a clear overlay by Making Memories that I've had in my stash for a while.  I really have to stop forgetting what great supplies I have!  :)  I layered the clear strip on some white cardstock so it would stay pink (and not bleh looking with the yellow patterned paper behind it).  Speaking of, the yellow paper is American Traditional Designs and the purple is ATD, but I'm not sure if they're the same company??  Anyway, I finished off the card with some gems and baby shower ribbon that I was looking to use up (success!).  I think this card turned out pretty cute and I hope you do, too!  

Thanks for stopping by, I hope you're staying cool!
-Suzanne :O )


Posted by Picasa

Monday, June 6, 2011

Masculine Mushrooms


Hi friends!  Can you believe it's Monday again?  That means it's time for another Woodware challenge!  This week we're sharing masculine cards, a category that's always tough for me.  I pulled lots of earth toned scraps for this card and used an image from Woodland Mushrooms.  I was originally going to stamp it with black ink and color it, but then I got the idea to try stamping it with my gradient ink pad by Adirondack (Cabin Fever) and I really loved the result!  I think it adds to the earthiness and simple always seems better to me with masculine cards.  I die-cut the focal point with my Nestabilities and traced around the same die onto some brown cardstock and cut it out by hand.  I love that the matting compliments the die-cut and isn't the same exact shape, only bigger.  (See how the corners are rounded on the mat?  A happy accident- I will definitely be using this tracing technique again!)  The sentiment is by stampingscrapping.com (love their Nestie-matching stamps!) and I added a blue ribbon to finish off the card.  


I hope you'll have some time to show us your take on this challenge!  Add your card here:


Woodware Challenge #30


Thanks for stopping by, have a GREAT week!  :D


-Suzanne :O )


Posted by Picasa

Sunday, June 5, 2011

Nursing Home Card Kits

Hi friends!  I've been teaching card classes at the nursing home where my mom volunteers for the last 3 months, so I wanted to share with you how I do that.  On the first Saturday of the month, I bring 12 card kits and then my mom runs around trying to gather people up.  Having a sign up sheet wouldn't work as people don't feel well, fall asleep, have visitors, etc.  I think my biggest group so far was 10 people, but I always make 12 kits since I have lots of  DCWV/MME/K&Co stacks that give you 3 sheets of each pattern.  I get 4 cards out of each sheet, hence the 12 kits.  


Anyway, this first picture was taken so you could see my mass production in progress.  Tying ribbons or handling small objects is hard for the group I work with, so they basically just glue the pieces together.  Below you can see where I was adding the green brads to the sentiment so that the pink piece was already put together for them.  :)  
Here's the first kit, a sympathy card.  The paper is K&Co, the stamps are Impression Obsession and I'm not sure if you can tell I embossed the off-white pieces, but it's got a damask design.


Next up is a get well soon card featuring Inky Antics stamps.  More K&Co paper and lots of Nestabilities used here.  I also paper pieced the turtle's blanket to match the patterned paper.


I started my class off with this card as the layout was very simple.  A Paper Smooches sentiment and some DCWV patterned paper paired up with some bright cardstocks make for a fun thank you note.

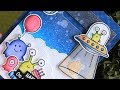
Last but not least is this cutie pie hedgehog by Penny Black (he was a big hit yesterday!).  More Nestabilities and DCWV paper used here, along with Target's dollar spot brads.


I thought you might want to see how the cards would look when they were assembled, so I just layered the pieces quickly so I could photograph them (that's why they're not all lined up; I just wanted to give you an idea)  :)


A deep turquoise-y-green ribbon was added to this card at the last minute, right over the off-white piece.  I tied the ribbon right before I started the class- it needed that extra embellishment, even though I try to stay away from things they can't manage.  


My mom could only round up 3 people yesterday because the nursing home was running a Bingo program at the same time- I can't compete with that!! :)  It went well though, one lady was 101 (!) and one man had had a stroke, so he couldn't use his left arm.  My mom and I were able to give them lots of attention, which we can't always do when we have a larger group.  


It's a little time consuming to make these card kits, but I *really* love using up my older supplies.  I'm always amazed out how much I end up liking papers I desperately wanted to get rid of after I use them in a kit!  :P  It's been really rewarding to do these classes and give back to my community in a way that suits me.  I hope to keep doing these classes as long as I have people interested!  


Thanks for taking a peek into my latest card making venture!  Hope you're having a great weekend!


-Suzanne :O )


PS-  Have extra kits is fine with me, I'll just assemble them myself and sell them at my next craft fair! :D
Posted by Picasa

Wednesday, June 1, 2011

Mouse with Cake


Happy Wednesday, friends!  If this little mouse doesn't make you smile, then you're probably a robot.  :)  I made this for my brother's girlfriend, whose birthday is tomorrow.  The stamp set is by Inky Antics (Millie Mouse Clear Set) and is especially awesome because the mouse comes with a blank area behind her arms, and she comes will all different accessories to hold.  She has different hats to wear, too!  


I had to stamp it a couple of times to get the cake to line up juuuuust right, near her fingers. The clear wasn't quite clear enough to line up all those details, but I'm glad I wasn't working with a rubber stamp! ;)  Of course I colored Millie with my Copics and used some more MME Quite Contrary papers (you'll be seeing more of these papers again very soon, I couldn't stop using them!).  To finish off the card, I wrapped some We R Memory Keepers twine around the card a few times and tied the bow off to the side.  I hope you like my happy little card!


Tomorrow I have off (use-'em-or-lose-'em vacation days) so I plan to stay in and get my nursing home card kits ready to go.  This time I'm going to take pictures so you can see what I've been doing with my little friends for the past couple of months.  :)


I hope you're staying cool (it's 90+ and humid again.. yuck!).  Thanks for stopping by!


-Suzanne :O )
Posted by Picasa
Related Posts Plugin for WordPress, Blogger...