Showing posts with label gift packaging. Show all posts

Friday, March 1, 2013

Spread the Love!

Hi friends!  This week, Clear and Simple Stamps is hosting a fun linky party and I wanted to make sure I submitted a project!  The idea behind their challenge is to make a card or project inspired by your "blog crush."  

My crush is easily Kerry from www.kerryspapercrafts.com.  I stumbled across her blog a couple of years ago when I did a search for craft fair projects, and her blog was just chock full of them!  She has a really cute and fun style and had so many different items to sell.  She also makes video tutorials, which makes it really easy to borrow her ideas!  The thing I really admire about Kerry is that she doesn't seem to hoard product like I do.  LOL!  Her craft fair tables are always so attractive and enticing, and that makes me push myself to try and create items that people can't say no to.  LOVE her stuff!  :D

The other half of the C&SS challenge was to use one of their fun color schemes.   I chose to work with this one:
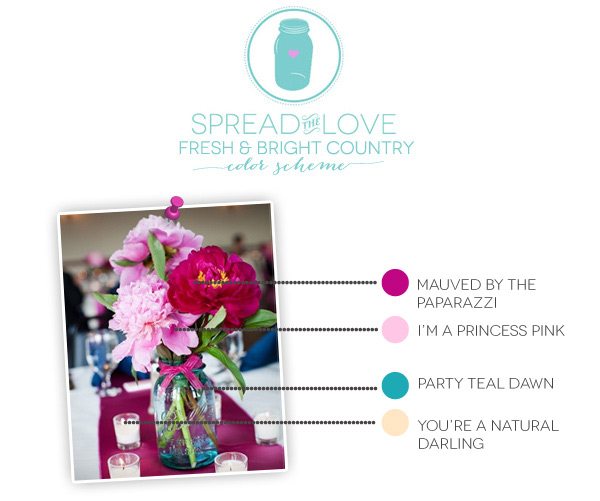

With the color scheme and Kerry's blog as inspiration, I decided to make a few fun sets of colorful clips:


They were really easy to make and came together pretty quickly!  I started off by covering some clothespins with patterned paper from My Mind's Eye (Lime Twist: Happy Go Lucky).  The part that takes the longest is sanding the paper to the clothespin, but that process really makes the clips look polished.  


Next I started working on the toppers, which is where my C&SS supplies came in really handy!  I used the largest die from Toppers and stamped it with the polka dots in Toppers Fillers.  The chocolate bunny outline and filler are from (retired) Easter Basket and Best Bunnies.  For the finishing touch, I die-cut some banners from Favor Flags and stamped the sentiment from Easter Basket.


Because I didn't have to do any coloring, all three toppers probably only took about 15 minutes to create.  LOVE when mass-producing goes quickly!  :D  I think the clear plastic bags I used are 3" x 4" and topper measures 1.5" x 3".  I also want to note how cheap the clothespins are- I get mine at the dollar store (36 in a pack)!  :)

I hope you enjoyed my craft-fair inspired project today!  If you're interested in linking up, you have until 9 a.m. tomorrow.  Visit Amber's blog for more details (and inspiration!).

Thanks for stopping by!
-Suzanne :O )


Sunday, February 24, 2013

Kiddie Valentines!


Hi friends!  I'm starting to get a little behind on my blogging again- ack!  Today I want to catch up a little and finish posting my Valentine's Day cards.  These are the valentines I made for my dad to give to his 3rd grade class.  A few years ago I had bought a package of SUPER cute die-cuts by K&Co, and of course hoarded them because they were too cute to use.  However, this is my dad's last year of teaching, so I figured it was now or never if I wanted to use them up.  You'll see later in the post that my dad has 24 students, but I had used one of the 24 die-cuts for Chris's valentine a few years ago, so I had to make my own die-cut.  ;)

I made 2 of each card; you can see all 12 designs below.  The die-cuts were rather large, so I cut my paper (single panel) to 5 1/2" x 6" and made my own envelopes with my new We R Memory Keepers Envelope Punch Board (LOVE this tool!).  


You can see that I scattered a lot of hearts and flowers and things all over the cards.  The die-cuts came with a ton of those small pieces and I wanted to finish them up, so they result is a very sprinkle-y card, but I think it's actually pretty cute.  And!- you know I love my puns!  LOL  So these cards were very simple to put together, but I'm totally in love with them.  :)

Okay, so I mentioned before that I had to make my own die-cut, because I only had one of the robots.  I scanned and printed the robot I had and added glitter to the knock-off version.  It didn't come out exaaactly the same, but I'm hoping the 9 year-old who got that card didn't notice.  ;)


Lastly, I want to show you what I did with the envelopes.  The envelope maker I just bought is super awesome.  It was only $20 and you can make up to 60 different-sized envelopes.  It's great for making wacky-sized cards like these.  It also helps you use up tons of patterned paper!  LOVE that!  :D  I tried to use 24 patterned papers that had an all-over design, so you wouldn't think one side of the envelope was upside-down.  


On the front of the envelope, I die-cut a circle and added a treat cup from Stampin' Up! filled with tiny erasers!  (I also wanted to finish up the treat cups!  LOL  I had had them for a few years and never knew what to do with them, so they went into my use-it-up pile.)  


I bought some pencils to go along with the erasers, and a tiny granola bar and some graham cracker Goldfish to finish off their treat bags.  I'm really sad that my dad is retiring; I've really loved making little crafty projects for his students.  It's always helped me use up a lot of product, and I love crafting with kids in mind.  I guess I'll just have to wait until I have kids and start crafting for their classmates!  ;)

Thanks so much for bearing with me through this long post today!  I hope you enjoyed my kiddie valentines and inspire you to use your treat cups for something other than candy!  :D

Thanks so much for stopping by!
-Suzanne :O )


Thursday, January 31, 2013

happy home


Hi friends!  I am not one to scrapbook (mostly because I don't take many pictures) but I think I did alright with this layout!  In the picture are Chris's sister and her fiance, Victor.  They had a get together over the summer at their new apartment, so Chris and I gave them this framed layout as a housewarming present.  All supplies are by Echo Park from their Life is Good line.  I chose that collection because of all the house stickers ;)  

This picture is actually one that Brittany took and shared on facebook because she liked her gift so much!  She's very much into photographs, and I think she was really touched that I made something so personal for her.  :)

The paper supplies didn't cost very much, and the frame I got from Michaels for $6 (with my 40% off coupon, of course).  I would definitely make one of these again for a housewarming gift... it was really simple to make and a "wow" kind of gift.  I hope you like it too, thanks so much for stopping in!

-Suzanne :O )

Tuesday, January 29, 2013

A Gift for Grandpa


Hi friends!  Tomorrow at work we're having a grandpa shower for our school social worker who just had his first grandchild a couple of weeks ago.  I got him a picture frame and a book, so I thought it would be cute to package them in a handmade bag.  (I had a little trouble getting the bag in my light box, so please excuse the picture!)  I used an 8" x 10" bag and adhered a piece of DCWV patterned paper.  I added an old chipboard giraffe from Basic Grey and thought about adding more embellishments, but decided to make a tag to fill the space instead.


I die-cut the larger tag from Clear and Simple Stamps (Tags 1) and stamped a tag outline from Trendy Tags.  The wagon, stack of presents and sentiment were stamped from Cart Pals: Baby.  I wanted to keep everything from getting too frilly because I'm giving it to an adult male (but this was tricky because the baby is a girl!  LOL).


Of course I needed to make a card to go with the gift, so I used a scrap from the same DCWV paper and used a focal piece I had made for a previous card, but ended up not using.  To finish off the card I added some old chipboard from Colorbok.  I hope you like my little gift ensemble, thanks so much for stopping by!

-Suzanne :O )

Sunday, January 27, 2013

Money Holder


Hi there!  The pictures above are of a money holder I made last summer for my boyfriend's brother.  There was a last-minute scramble to come up with a gift, so I told my boyfriend he could just give cash and I would make it look pretty.  :)  Because we were in a rush, I don't think this is my best work, but I still wanted to share the idea.  

I started off with a bunch of supplies by Clear and Simple Stamps and some papers by K & Co.  The tri-fold card was made from this die:


As you can see, the die comes with that swirly shape, so I cut out some orange cardstock, stamped the robot from the set below in orange ink, and trimmed it out:


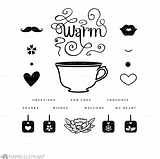
I stapled a scrap of ribbon and stamped a sentiment from the same set on the orange cardstock; the banner sentiment is from this set:


On the inside, I used another scrap of the blue polka dot paper that was used on the banner and stamped the sentiment from a retired set called Celebrate.  I glued the strip of paper down on the sides and bottom so I could stick in the money in on top.  I used a lot of different sets to pull this together, but this could easily be mass-produced or used for gift cards!  I hope you like my project, thanks for stopping by!

-Suzanne :O )


Posted by Picasa

Sunday, January 13, 2013

Halloween 2012 Picture Parade

Hi everyone!  Today's going to be another really long post, with all of my Halloween cards and the gift bags I made to give my co-workers (I got them Halloween tablecloths).  It's always my goal to use up all the little bits and pieces I have- swapped images, old patterned papers, die-cuts, stickers, etc., so you'll see a lot of that here.  Maybe one day I'll be able to create cards from scratch and use some of the stamps that are patiently waiting to be opened!  :)  Anyway, enjoy the show and thanks for stopping by!

-Suzanne :O )  


Tuesday, January 8, 2013

Craft Fair Photos


Hi friends!  Today I'm sharing pictures from my Christmas craft fairs.  I did two shows, one on a Saturday, the other the next day. The picture above is the center table at the first craft fair.   You can see the banner I made, in rainbow colors, of course, that says "The Card Garden."  LOVE!  :)  I haven't totally figured out how to get it to hang securely, but using some picnic table clamps seems to be working okay for now.  That table had lots Christmas cards and some Thanksgiving/fall themed cards (it was the weekend before Thanksgiving, I believe).  I also made some Thanksgiving themed pencil packs, which I sold for $1.


The table below had my super popular snowman soup and cake-in-a-cup mugs.  I amassed 62 mugs throughout the year, picked up from thrift stores and garage sales, usually for just a quarter.  When I first realized just how many mugs I had, I panicked thinking that I went overboard, but it turns out I didn't!  As you can see, the table was fully stocked, so I had two copy paper boxes beneath the table that people started to pull out and rummage through once they realized there were additional mug choices.  Many people bought 5-10 mugs each, so they went fast!  I sold these for $3 each, and a couple of people told me I wasn't charging enough!  :)

The cake-in-a-cup mugs also sold really well; I believe I sold 12 or 13 mugs at the first show, out of the 16 I started with.  I also had a bunch of snowman soup packets (for $1 each) in the basket, and those sold out on by the end of the first day.  Some girl had been looking in my booth at one point, but hemmed and hawed about getting the packets.  When she came back later, I heard her say to her friend, "oh, there are only eight left."  I asked her how many she needed, and she said ten, so I put two extra packets together while she waited.  I had brought the materials to make 50 more packets, but my booth had been so busy that day, I never got a chance to work on them!  Anyway, once I was done scrambling to fill her order, I set to work on the other 48 packets and filled my basket up.  You can't hem and haw, people, I can't keep up!!  LOL!  I started out with 150 packets all together, including the ones used in the mugs, and I only had 7 packets left, and that's because one of the craft fairs I signed up to do got canceled on me.  Needless to say, snowman soup is always my biggest seller!


Okay, so the last table was set up with all of my office-y type products.  I'm not sure how clearly you can see everything, but in the back I have a basket with handmade tags, some altered composition books, gift card holders and lots of post-it note pads.


These magnetic clips were a BIG hit.  I sold 15 out of 16 on the first day!  I bought clothespins at the dollar store, decorated them with some Authentique paper and added strips of magnets to the back.  I sold them for $3- people loved their practicality!


These post-it notes were copied from Kerry.  I know she sells them like hotcakes, but I think I only sold one or two.  I have a ton left over.. perhaps I'll get around to posting them in my etsy shop some day.  They're made from plastic picture frames and patterned paper.  I don't know if I was charging too much ($4) or if people didn't like the paper or what.  Maybe if I had sold them with pens like Kerry does, that would have convinced people to buy.  I'll have to try again and see if I do any better with them.  :)


These next few pictures are from day two of my craft fairs.  This show provided the table, so you can see that I had to smush whatever I had left onto an eight foot table.  I think I only had one of the magnetic clips left, and those sold, along with many more mugs and handmade tags/gift card holders.


That's pretty much it for today.  Thanks for bearing with me through the long post, and if you have any questions about anything you see on the tables but I didn't mention, please let me know.

Thanks so much for stopping by!
-Suzanne :O )

Sunday, January 6, 2013

Post-it Notepads


Hi there!  I almost forgot to get today's post in- I've been out and about with my honey and the day nearly got away from me!  :)  Challenging myself to post every day this month has really pushed me to share my creations though, and I didn't want to let myself down so I'm squeaking this post in now.  Today I'm sharing the last of my Christmas projects- some notebooks made for my dad to give to his students.


I used these awesome boards from Arnold Grummer (you get two square pieces of chipboard for the front and back covers and a thin piece for the spine).  There's a template you use to trace onto patterned paper; after you cut out the template, you glue the boards down and cover up the middle with another strip of paper.  I may have made that sound complicated and/or time consuming, but it's totally not because it's all straight cuts, so I use my paper trimmer and it gets done in a flash.  If anyone's interested, I can show you the process step by step.

I wanted to decorate the covers minimally because I had 24 to make, and of course didn't have much time.  The snow globes came together with help from some Papertrey Ink dies and stamps:  Winter Snow Globe.  I'm not thrilled with the red ink I used... I wish it was a deeper red, but that's all I had on hand.  Otherwise, I'm pretty happy with how easily and quickly these came together!  My dad packaged them with some pencils, and his kids' gifts were all set and cheap to make, too!- I think each set of boards cost maybe 25 cents, and the post-its were purchased for less than $4 for a pack of 12).  Here's a closer look:


Well that's it for today!  If you want to see how these books are made, please leave a comment and I'll do a tutorial for you.  What's great about these boards is that you can decorate them with any patterned paper and make totally customized gifts!  :)  Hope you like them, thanks so much for stopping by!

-Suzanne :O )

Oh, PS-  I forgot to post these pictures when I did my Christmas card post.  I made them at the last minute and they weren't photographed at the time all the others were, so here they are now:


This was a super simple card- patterned paper and a Rudolph sentiment adhered with a snowflake brad.  Seriously took 3 minutes to make.  :D


This set was made with some penguin stickers, Doodlebug patterned papers, and various red ribbons.  I thought the black cardstock helped pull the look together with the black on the penguins.  :)

Related Posts Plugin for WordPress, Blogger...