Monday, July 25, 2011

hopin' for carrots!


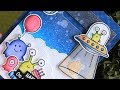
Hi friends!  I'm just popping in to share a silly card with you today!  This bunny and carrot are from a brand spankin' new Paper Smooches set called "a little lovin" and the present is from "santa paws."  The thought bubble was created with a little masking from the "sugar rush" set (I used the foam on the ice cream soda) and the bubbles from "birthday buddies."  This bunny cracks me up alone, but when I had the idea to make him look like he's REALLY hoping there's a carrot in at least ONE of those presents, he made me giggle even more!!  :D


The sentiment is from "sentiment sampler"- I guess I ended up using quite a few Paper Smooches sets for this one little card, but it's proof that all the sets are so interchangeable.  :)  The papers are MME Lime Twist and I used a scrap of lime green K&Co paper for the matting.


I hope you get a kick out of this card; it's going to my boyfriend's 17 year old brother- teenage boys are like the toughest of the tough for me when it comes to making cards, but hopefully CJ will smile when he opens his card.  :)  Hope you have a great day, thanks for stopping by!!


-Suzanne :O )
Posted by Picasa

Snowball fight!


Hi there!  Time for another Woodware USA challenge!  This week we were asked to do some background stamping, which I haven't done in a while.  I went through my Woodware sets and decided it was time to start bringing out the Christmas stamps!  The mischievous boy from Winter Tots caught my eye, so I thought it would be fun to stamp him on the focal piece and stamp lots of snowball splatters to make my own patterned paper.  I colored Master Tot with my Copics and gave him a pile of snowball arsenal to complete the scene.  I used my Nestabilities for the square/scalloped square and some dark blue cardstock from my stash.  I came across some old (one of the first supplies I bought, actually!) holographic paper by Crayola that I actually picked up at the dollar store.  I wanted to see what it would look like embossed, and it came out pretty neat!  You can't see too well from the picture, but it's embossed with snowflakes and it has a rainbow sheen when you move the angle of light.  It's a little busy though, so I covered it with a strip of red cardstock and added a green gingham ribbon on top of that.  To the bow, I added two blue buttons tied off with some twine.  The bow looks better at this angle:


The snowballs were stamped with Colorbox ink on white cardstock and I like that it's a subtle background, but hopefully it makes you chuckle when you look closer.  :)  If you have time to do some background stamping this week, we'd love to see your creation!  Be sure to link up here:


Woodware Challenge #36


Thanks for stopping by!


-Suzanne :O )
Posted by Picasa

Wednesday, July 20, 2011

thanks for your business


Hi friends!  Just a quick post today.. with all of my Etsy orders, I send a handmade mini card to express my thanks.  A while back, I made a batch of 12 mini cards (all the same) and though they've lasted me a while, I just had a repeat customer, so I wanted to make a new card for her.  I used two sets by Clear & Simple stamps- Crop Night Darling and the limited edition Thank You set.  


I stamped the scrappy items in different Colorbox inks and stamped the sentiment in black.  The focal piece was layered on aqua cardstock and a pink mini card base by K&Co.  I used a bottle of Stickles so you could see just how mini it is!  :)


Hope you like it, thanks for stopping by!


-Suzanne :O )
Posted by Picasa

Tuesday, July 19, 2011

have a magical day!


Hi there!  This card was made for my friend who is into all things cute!  He collects lots of little toy figures, so I thought this patterned paper from Sassafras Lass's Nerdy Bird line would be perfect for him.  When my oldest brother moved out, he gave me a pad of graph paper he found in his room, so I pulled that out and matted it onto some green cardstock.  The patterned paper went on top and I wrapped some Target ribbon around the bottom.  I stamped the Hero Arts sentiment with some pink Colorbox ink right on the graph paper- it was so easy to line up the stamp! :)  For the 30 embellishment, I used my circle and scalloped circle Nestabilities to layer scraps of cardstock and stamped the Stampendous numbers with some aqua ink for a tone-on-tone look.  I heard that my friend was having a hard time with turning 30, so hopefully this card cheered him up!  I hope it makes you smile too, thanks for stopping by!


-Suzanne :O )


Posted by Picasa

Monday, July 18, 2011

Clowning Around Card & Tag


Hi there!  Welcome to another Monday challenge over at Woodware USA!  This week the DT is using another one of Kerry's fabulous sketches, but this one is particularly great because it's interactive!  Here's the sketch:


My thought process with this card started off with figuring out what to stamp on the tag.  I wanted it to be something fairly long, to match the shape of the tag, so I pulled out my Clowning Around set (even though I just used it for my 4th of July card!) and chose the tall clown.  I colored him with my Copics and gave him a bright, cheerful outfit to wear.  You can see in the photo below that I added the sentiment beneath him to balance out the white space.


Next, I created the pocket with a scrap of green cardstock, which was run through my Cuttlebug with an old embossing folder.  I added some orange gingham ribbon to the pocket before gluing the sides and bottom to my card.  I deviated a little from the sketch here, but I thought a star would be a cute little touch, and I used a portion of the sentiment "fun at the" to jazz it up.  The patterned paper is DCWV- doesn't it make you feel festive?!, and the blue cardstock was in my stash. :)  To finish off the card, I added more gingham ribbon to the hole in the tag and tucked it into the pocket at an angle.


I hope this card makes you smile, I'm really loving these clowns lately!  If you have time this week, we'd love to see your take on the sketch!  Don't forget you can be considered for a guest designer spot if you put an asterisk next to your name when you link up:


Woodware USA Challenge #35


Thanks for stopping by!
-Suzanne :O )

Sunday, July 17, 2011

Way to go


Hi there!  I'm back again to share this card I made for my oldest brother.  He has spent the last four years taking classes to become a journeyman and he recently passed his certification test (he's a welder) so my family took him out for a celebratory dinner and gave him this card.  I made it when I still had my 4th of July supplies handy, so I thought it would be fun to group some stars together for the focal point.  The stamps are from Hobby Lobby and I used different Colorbox inks to coordinate with the MME patterned papers (Lime Twist- Fly a Kite).  I popped them up on different thicknesses of foam tape- hopefully you can see that in the photo below:


The sketch is based off of June's SFYTT, which I'm a little bitter about because I was too late to submit my card- rats!  I had the card made but I hadn't taken the picture and posted it in time, so now I'm out of the running for the grand prize in December, but that's my own fault.  I can always play again next year. :)  Anyway, onto the sketch!


For that bottom strip, I stamped the Paper Smooches sentiment a few times to punctuate the card's purpose.  My brother is a pretty humble and modest guy, so I wanted to get really festive with this card- it has been FOUR years, after all!  :)

I hope you enjoy this bright and cheerful card, thanks for stopping by!

-Suzanne :O )


Posted by Picasa

Saturday, July 16, 2011

Etsy Update

Hi friends!  Just wanted to let you know I posted lots of trims (remember my recent score during the 4th of July?) in my Etsy shop.  I'm passing along my bargain with you.  I'll have more trims posted soon (it's a time consuming to edit pictures and post on Etsy!)  :)  Please let me know if you have any questions!


Thanks!

-Suzanne :O )

Eat something cute!


Happy Saturday, friends!  I'm excited to share this card with you today because I've found a new stamp company that has images right up my alley!  I stumbled across 2 Cute Rubber Stamps in my blog travels and I don't usually order on a whim, but Heidi's stamps are SO cute (2 cute, even! lol) that I had to place an order right away.  :)

I can't tell you HOW I got this little turtle (not for a few weeks, anyway) but he's a digital image and you can pick him up in her etsy shop.  I strongly encourage you to check out her shop if you like cartoonish images like I do.  :)  I colored my turtle friend with Copics (and you can tell when you zoom in that I used the wrong kind of cardstock, so some of the green ink spilled outside of the lines) and decided to go with a happy rainbow of sauces on vanilla ice cream.  :)  The sentiment is Darcie's and it just seemed to go really well with the image. 


The sketch is the most recent one from Clean & Simple Stamping:


The papers are all DCWV except for the pink cardstock and orange gingham which were in my scrap pile.  I added a few gem brads not only to balance out my card, but because the DT for 2 Cute Rubber Stamps has a challenge going on to use bling.  Here's another shot of the card- I was trying to get the gems to look lit up (that's always so hard for me!).


I hope your weekend is off to a great start this morning!  This afternoon I'm teaching a card class at the nursing home by request.  I went 2 weeks ago and couldn't get any participants because the activity that was concurrent with mine was to go outside and I couldn't compete with that, so I headed home thinking I would just go back to the nursing home in the fall- my card making class would be better for the cooler months since it's a good indoor activity.  I wasn't upset, I just wanted to offer this class if people were interested.  So anyway, I had resigned myself to coming back in October when my mother spoke to a woman who said she only had one card left and wanted to know when I was coming back.  LOL!!  I'm glad to hear she's been using her cards and she's a really sweet lady, so of course I agreed to go back- I just hope she doesn't have other plans when I get there!  hah!  Anyway, thanks for bearing with my babble, and thanks for stopping in!

-Suzanne :O )


Posted by Picasa

Thursday, July 14, 2011

Peek-a-boo!


Hi there!  I guess it's been a few days since my last post so I have some catching up to do!  One of my co-workers just had a baby girl, so I made a cute little card based on this month's SFYTT (sketch for you to try):


I used some older products here but I think they're cute no matter how "old" they are.  :)  The patterned paper is a dollar store pack (Miss Elizabeth's) and I used some pastel scraps for the other parts of the sketch.  The first piece of this card I knew I wanted to use were the chipboard stars by Colorbok.  I've had them in my stash forever, so when I saw the sketch I had planned to swap the circles for stars.  I wanted an image to correspond with the "peek-a-boo" sentiment so I went through my baby supplies and found this old vellum bear from Hot off the Press.  I cut my little friend out and added him to white cardstock so the pink glitter paper wouldn't show through.  To finish off the card I added some purple (w/ yellow polka dots!) ribbon by American Crafts and tied it in a simple knot.

I don't think you can tell that the products on this card are dated- cute is cute, I hope!  :)  Thanks for stopping by, I always appreciate your support!

-Suzanne :O )


Posted by Picasa

Monday, July 11, 2011

Cute Fluffy!


Hi everyone!  We're back this Monday with another Woodware challenge!  Can you guess what it might be..?  If you happened to guess paper piecing then you're right! :)  I really went to town on Fluffy here- you can see below that I paper pieced his body, scales, wings, and even his teeny tiny eyes, teeth and fingernails!


I cut Fluffy out, popped him up on foam tape and set him aside.  I layered the orange patterned paper that resembled fire to me (I believe it's by K&Co) on top of some green cardstock.  To that, I added some white cardstock and a strip of green patterned paper.  To make the sentiment embellishment, I stamped the sentiment with some green ink onto white cardstock and then cut it out with my Nestabilities.  I then traced that same die onto a deep red cardstock so it would mat the sentiment.  He IS cute, isn't he?! :)

After adhering all of my layers, I was ready to add Fluffy and a couple of orange buttons.  It took me a little while to get Fluffy all assembled, but I think it was worth it- I love his green stripes.  :)  I hope you'll have some time to play along with our challenge this week!  Link up here:


Thanks for stopping by, I hope you have a great day!

-Suzanne :O )

Friday, July 8, 2011

Birthday Turtle


Hi friends!  Just a quick post tonight.. I made this card back in May for Chris's birthday (the card my parents gave him).  I started out with that cutie pie turtle from Sweet 'n' Sassy stamps.  I colored him with my Copics and cut him out with my Nestabilities.  The patterned paper is MME- the blue paper is actually the reverse side of the star pattern, I just flipped the die cut around so it would mat the image.  The green patterned paper is K&Co and I punched some stars out of cardstock scraps.  (I've been using my star punch a lot lately!)  I added some buttons and twine in the same colors for a monochromatic embellishment.  


I hope you enjoy my festive card, thanks for stopping by!


-Suzanne :O )
Posted by Picasa

Tuesday, July 5, 2011

Clean and Simple: Enjoy


Hi everyone!  My mom requested a birthday card for her cousin John who's in his 60's, so I went over to the clean & simple challenge to keep my card from getting too frou-frou.  :)  Their sketch this week used circles, but I thought it would be fun to change it up a bit and add some punched stars:


I used only scraps on this card, starting with the lighter turquoise background from K&Co and then I added pieces of cardstocks and patterned papers from there.  My only embellishment was some ribbon by Anna Griffin and the sentiment is a Clear & Simple stamp.  It was hard for me to find an appropriate sentiment small enough to fit inside the star, but I made it work.  ;)  Again, I promise you this card is more of a green turquoise than the blue it looks like here, but I still can't get my camera to cooperate!  Anyway, I hope you like my clean and simple card, thanks so much for stopping by!

-Suzanne :O )


Posted by Picasa

Monday, July 4, 2011

Jelly Bean Tubes


Hi friends!  Hope you're enjoying your Independence Day!  My day took an unexpected turn when I woke up this morning to a fried computer.  :(  It just wouldn't turn on, so I guess after 6 years it went kaput.  Luckily Chris had off today, so we went down to our nearest Apple store and I finally switched over to a Mac.. an iMac to be exact.  I couldn't get over how huge the screen was and how tiny the computer was overall.. no more tower, hooray!  I'm still getting used to the differences between this and my old PC, but I think it was a good change.  Chris is going to work on getting all of my old files back (tons of pictures and music, in addition to college papers and such) so hopefully I won't lose everything.  


Speaking of, I thought I would have to postpone or forget completely my post on these jelly bean tubes, but luckily the pictures hadn't been deleted from my camera card yet, so I'm able to share them with you now!  I picked up the clear tubes at a scrapbook convention a couple of months ago with the intention of  using them for my Fourth of July treats.  I like to give my co-workers a little something on each holiday, so I bought the tubes and figured I'd find something to fill them with eventually.  We have a local grocery store that's more like a farmer's market and they usually have festive candy treats every holiday, but all they had was hard candy in the shape of stars and Tootsie Rolls with flags on the wrappers.  I didn't really feel excited about giving hard candies and the Tootsie Rolls probably wouldn't have fit well in the tubes.  I was about to give up my search when I saw their display of Jelly Bellys---- ding! ding!  Of course the answer was to pick out only red, white, and blue colors, so I narrowed down my choices and settled on french vanilla, strawberry, and blueberry (neutral flavors, I hope).  


After filling up my tubes I set to work decorating some plain white tags.  I embossed a scrap of navy cardstock with polka dots and added some stars- the red one is a Hobby Lobby stamp that I cut out and the blue one was punched out with a Fiskars punch.  I layered them with different thicknesses of foam tape for added interest. To tie them to the tubes, I used a bit of craft floss which was dyed with different shades of blue.    


To finish off the tubes, I stamped a Studio G image on a white circle and layered it onto a navy blue scalloped circle and adhered it to the top of the tube.  I stuck some patterned ribbon around the edge of the top to jazz it up, but in hindsight it looks a little busy to me, like it's competing with the jelly beans and it's not the same exact colors as the jelly beans either.  Ah, well, there's always room for improvement, right?  :)


Here's another "group shot" of the tubes.. my co-workers were really impressed, though this project didn't take me very long at all to complete, nor was it hard to do.  It was a lot of fun to put together though, so if I see more tubes at another scrapbook show, I'll probably pick them up for Halloween!!  


It was hot and humid here in NY today, so Chris and I decided to stay in rather than get eaten alive by mosquitos during the fireworks show.  :)  I hope you all had a wonderful weekend!  Thanks for stopping by!


-Suzanne :O )
Posted by Picasa

Sunday, July 3, 2011

Freedom


Hi everyone!  Happy Fourth of July!  Above is a set of cards I made using those vintage image books that come with a CD so you can print the images as many times as you like (hopefully you know what I'm talking about! lol).  I set up the printing so I would get 4 images on a sheet of 8.5 x 11" cream cardstock and cut the girl out with my circle Nestabilties, careful to leave the flag outside of the circle. 


Next up I punched some stars out of a vintage book, some kraft cardstock and the red DCWV patterned paper (you can't see where I punched the star because I covered it with the blue cardstock ;).. sneaky huh??  lol  Then I die-cut the banner with my Nestabilities and stamped it with a Clear & Simple sentiment in Cranberry Colorbox ink.  I distressed the edges with Creamy Brown Colorbox ink. 


The middle layer has Stampin' Up! ribbon, navy cardstock and lighter blue cardstock punched with a Fiskars border.  I really like how these different supplies came together, from the swirly sentiment to the patterned paper and the text stars, to complement the vintage image.  I hope you enjoy this card set and have a safe and happy Fourth of July!  I'll be back tomorrow with some patriotic jelly bean tubes!


-Suzanne :O )
Posted by Picasa

Saturday, July 2, 2011

Land of the Free


Hi friends!  Hope you're all gearing up for a fun Fourth of July weekend!  I don't have any travel plans, but this morning, Chris, my mother and I went out to the "Great American Weekend" which is basically just an outdoor festival a couple of towns away.  I've scored some really great ribbon (those giant 50 yard rolls for $2!!) before in their antiques section and I made out like a bandit again this year.  The same vendor had giant spools of crochet trim- I got an inch wide trim in black and a 1/4 inch trim in white- both were probably 100 yards (maybe a little less) for $3 each!  I also picked up 5 yards of a tan trim similar to the black one for $1 and I looked at a couple of other 5 yard trims but decided against it.  Then the lady was like, no, I'll just throw them in there, along with an inch wide white trim, so I spend a total of $7 and got a TON of different crocheted trims!  I'll probably be sharing them on etsy very soon.  LOVE bargains like that!!  :D 


This afternoon I have another card class at the nursing home (I'm using leftover kits from last month since I had a very small turnout in June) so it should be a busy day today!  I have plans to go to dinner with my family tomorrow and I'll see about fireworks Monday.  I love these long weekends!  :)


The card above is the one I gave to Chris since it's so bulky that I didn't want to mail it.  It started out with those three star buttons that I picked up at my thrift store for 75 cents.  Kind of pricey for me, especially coming from a thrift store, but I knew they would be perfect on a vintage card.  I had actually asked Chris to pry the shanks off for me (they were metal pieces glued on, not just a shank I could trim off with my shank cutter) so he helped me make his own card!  hehe  Anyway, I diecut a piece of kraft cardstock with my Nestabilities and embossed it with polka dots.  I added that to a piece of DCWV patterned paper and punched out the corners with my Stampin' Up! ticket punch.  I matted the patterned paper on navy blue and kraft cardstocks and added some brads from Michaels Recollections line.  The banner was diecut with off-white cardstock and stamped with a sentiment from Clear & Simple stamps.  I inked around the edges for a distressed look.  My last step was to adhere down the buttons.  This card is a different look for me, but I love the rustic Americana feel to it- perfect for a masculine card!  


I hope you're all enjoying the start of your weekend and I'm so thankful that you stopped by!  


-Suzanne :O )
Posted by Picasa
Related Posts Plugin for WordPress, Blogger...