Saturday, December 31, 2011

Cake in a Cup


Happy Saturday, friends!  I'm back today to share the cake in a cup mugs I had mentioned in yesterday's post.  This was another BIG hit at my craft fairs.  It was so popular I had to make another batch!  I found the recipe for the mix in a Gooseberry Patch book and it's pretty simple to do.  If you're interested in making your own, you can buy the recipes, "Cake in a Cup" labels, and dry mix/glaze recipes from my Etsy shop.  You get all 3 PDFs for only $4 and you can print them as many times as you like!  Here's the link:


Cake in a Cup Label PDFs


These didn't take long to make and come in handy for teachers, co-workers, Secret Santas, bus drivers, coaches, neighbors, etc.  I charged $3 each and people were buying them in multiples (and I think a few people bought just for themselves! lol).  I made a little pocket for the recipe with kraft cardstock, similar to the ones I used on the cookie in a jar mixes.  I added scraps of patterned paper and used some paper punches for the label.  I'll definitely be making these again next year and I'll probably try different flavors of cake (theses are all chocolate with chocolate glaze).  Feel free to email or comment with any questions.  I hope you enjoy this gift idea! 


-Suzanne :O )
Posted by Picasa

Friday, December 30, 2011

Cookie Exchange/Cookies in a Jar


Hi friends!  Popping in with another post today- this one's pretty lengthy, so bear with me!!  I have a LOT to catch up on with my craft fair goodies, Christmas cards and gift packaging.  I'll start with the packaging I whipped up for my cookie exchange at work.  I made oatmeal butterscotch cookies with walnuts and used these bakery bags I had picked up at a yard sale.  We were supposed to include our recipe, so I clipped that on with a regular old paper clip and added a fun tag using some stamps by Clear & Simple Stamps.  The overall effect is a little busy, a little messy, but I really wanted to use these stamps!! LOL  The cookies I stamped on the background are from Cookie Bake:


The sentiments were stamped on some flags I die-cut with my Nestabilities and stapled onto the tags.  This was a very quick & easy project since I was in a rush (every year I always think I'm going to *make* time for things like this, but it never seems to happen the way I plan! lol).  I also have the Cookie Bake Extras set which came in handy for my cookies in a jar:


I made up 5 different jar recipes and sold them for $7 each at my craft fairs.  I made 15 jars all together and had 6 left over at the end of the season.  Luckily, Chris had 5 co-workers he wanted to give gifts to, and the last remaining jar went to his mother as a hostess gift on Christmas Eve.  I was worried that I would have a ton of food items left over from my craft fairs, but everything that didn't sell eventually found a home (you'll see as I keep posting what else I made).  ;)  Anyway, onto the jars and their tags!


The pic above shows 4 of the varieties, and the picture below shows the 5th on its own display:


I guess I remembered to put the flash on in the picture below, and you can see a peek of my cake in a cup mixes to the left:


Here's a close up of the tag; you can see how I used the cookie words stamp to make a background.  The pocket for the recipe was made out of kraft cardstock, and I believe the dimensions were 4" x 9", scored at 3".  I used some staples at the top and printed the recipe and the name of the mix from my computer.


I realized too late that I probably should have taken a side view of the jars so you could see how the layers looked, but you get the idea.  :)  It was a bit of work to make these, but my customers and Chris's employees really seemed to like them!  Thanks so much for sticking through this long post!

-Suzanne :O )


Posted by Picasa

Thursday, December 29, 2011

With Sympathy


Hi friends!  Just popping in with a quick post in what I hope is a string of more regular posts!  My boss's mother passed away last week so I wanted to make a simple but thoughtful card.  I started with that enormous clear sticker by American Crafts.  They seem to be my go-to for sympathy cards because they take up most of the space on a card when I get stumped for an image to use.  They're a little hard to use when they stick to themselves but I love how quickly I can put cards together with them.  The beige background is actually some packaging I recycled and the green satin ribbon was in my scrap stash.  I die-cut a ribbon slider and stamped the Impression Obsession sentiment with brown ink.  To finish off the card, I punched an indent with the tip of a circle punch, tied the ribbon with some twine and added a vintage button on top.  Oh, and I punched out the corners, too.  :)  I like that the colors are bright but get toned down with the earthy cardstocks.  I hope you enjoy my card too, thank you for stopping by!!


-Suzanne :O )
Posted by Picasa

Tuesday, December 27, 2011

Last PTT challenge!


Hi there!  This post is the last for my PTT term, which is kind of a good thing so I can have a breather and make cards on my own schedule.  :)  This week was a simple 'anything goes' challenge featuring this adorable giraffe trio by Karen's Doodles.  I colored the carolers with my Copics and used my Nestabilities to die-cut the image.  This post also wraps up the month-long sponsoring by My Mind's Eye and 3 Girls Jam wrinkle ribbon.  I've had a lot of fun with the other 'party planners' and wish the best to the new members!  Thanks for a great 4 months!!


-Suzanne :O )
Posted by Picasa

Friday, December 23, 2011

Snowball Fight


Hi all.  I'm a bit behind this week on my PTT card because I was in a car accident last week.  My car is still being worked on and I have an appointment with a hand specialist today to see why my left pointer finger is still swollen.  Otherwise, I'm okay and my insurance company has been great.  It was just not great timing- too much going on at this time of year!!  :)  Anyway, onto my PTT card.  We were asked to make ribbon the focal point, so I wrapped the 3 Girls Jam wrinkle ribbon around the card, similarly to how I wrap presents.  The image is by The Greeting Farm, and boy is that an adorable scene!!  I used my Copics and Nestabilities for the image and the blue snowflake paper is by My Mind's Eye.  To finish off the card I added a lime green button from my stash.  I hope you're enjoying these last couple of days before Christmas, thanks for stopping by!


-Suzanne :O )
Posted by Picasa

Tuesday, December 13, 2011

PTT #46


Get out your red and green supplies, it's time for this week's PTT challenge!  :)  I used some more paper from My Mind's Eye and this sweet little image by The Paper Shelter.  A little wrinkle ribbon from 3 Girlsl Jam finished off the card- all in all, a pretty simple card!  I hope you'll have time to play along this week, we'd love to see your creations!


Thanks so much for stopping by!
-Suzanne :O )
Posted by Picasa

Tuesday, December 6, 2011

PTT #45


Happy Tuesday, friends!  It's the start of another challenge over on the PTT blog; this week we were asked to make a holiday card.  That was a no-brainer, I am in full Christmas card mode now that my craft fairs are over!!  We were super lucky this month to have My Mind's Eye as one of our sponsors- I am totally LOVING this collection of papers!  We were also given this lovely wrinkle ribbon from 3 Girls Jam, which matches the papers perfectly!  The adorable image is from Paper Makeup Stamps.  I colored Penguin Pete with my Copics and die-cut him with my Nestabilities.  I wanted the sentiment to match his scarf, so I just colored the white cardstock with my Copic marker and made a coordinating embellishment!  I hope you'll have time to link up:


PTT Blog


Thanks so much for stopping by!


-Suzanne :O )
Posted by Picasa

Sunday, December 4, 2011

Cookies and Milk


Hi friends!  Check out my post on the 2 Cute Rubber Stamps Blog to see the details on my card!  Hope you're having a great weekend, thanks for stopping by!


-Suzanne :O )
Posted by Picasa

Tuesday, November 29, 2011

PTT #44: Blessed


Hi friends!  This week's PTT challenge is anything goes, so we'd love to have you play along!  I used this sweet image by Crafts and Me and used my Copics to color it in.  I used a bit of Viva Decor Pearl Pen on her wings to give them a subtle shine.  Love finding new uses for that pen!  :D  The image was cut out with my Nestabilities and embellished with some red bakers twine.  The patterned paper is DCWV.  I hope you'll have time to play along with us this week, we always love seeing your creations!  Don't forget we're looking for new DT members as well.


PTT Blog


Thanks so much for stopping by!


-Suzanne :O )
Posted by Picasa

Thursday, November 24, 2011

Happy Thanksgiving!


Hi friends!  Hope you're all prepping for a wonderful Turkey Day!  I just wanted to pop in to share my Thanksgiving cards for this year.  I had actually made them last year, knowing that this time of year always gets hectic and I usually run out of time!  :)  I used some old patterned paper by DCWV and strips of wine bottle wrappers I had found at Marshalls for like, 50 cents.  The image is Studio G and was stamped on the corresponding wine bottle labels.  The image was colored with my Copics, here's a close up:


I made a set of 12 to use up the wine bottle supplies and to make sure I had enough cards on hand!  :)  I hope you all have a great day and have many things for which to be thankful!


Chris and I are off to have brunch with his family and a quiet dinner with my family.  Thanks so much for stopping by!


-Suzanne :O )
Posted by Picasa

Tuesday, November 22, 2011

PTT #43- Snow Us What You Got!


Hey there!  Time for another Party Time Tuesdays challenge!  This week I was given an adorable image from Simply Betty and I LOVE the underwater twist on the typical holiday image!  I colored my merman with Copics and of course made his snowman into a sandman!  :)  The sentiment is Starving Artistamps and the patterned papers are various scraps from my stash.  The snowflake embellishment is a foam piece decorated with some more lovely Viva Pearl Pen dots!  Love this stuff!!  I hope you have a chance to play along with our SNOW themed challenge this week!  Thanks so much for stopping by!


-Suzanne :O )
Posted by Picasa

Thursday, November 17, 2011

Woodware Christmas Tags


Hi friends!  The Woodware blog has been inactive for a little while due to some shuffling in leadership, and though I'm sorry that the former team has parted ways, I am very excited to be working with our UK counterparts!!  We're still trying to figure out how this will all work, but for now, there's a month-long sketch challenge on the Woodware USA blog!  I made a set of 10 tags using the sketch:


I didn't realize that it's more of an oval than a circle, but I wanted to use my Christmas Rounds stamp set, so I was a little loose with my interpretation of the sketch.  ;)  These tags were super easy to make!  I started off with my beloved tag die from My Favorite Things and then added some patterned paper (from my scrap stash- I don't remember the manufacturer) to the bottom half of the tags.  Then I added white ric-rac (although I had to use regular ribbon on a few as I ran out of the ric-rac) and a gold eyelet to each one.  The "To/From" sentiment is by Darcie's.  Lastly, I stamped the circular sentiment and teeny tiny present from Christmas Rounds and punched it out with my 1 1/4 paper punch.  The present was colored with my Copics and the embellishment was popped up with foam tape.  You can see a close up of the tag below:


I really had a fun time making these, and they didn't take more than an hour to create!  I love seeing my little batch of tags all ready to go!  :)  I hope you'll have a chance to play along with us, and remember, you have until the end of the month to link up.  


Woodware USA


Thanks so much for stopping by, have a GREAT day!
-Suzanne :O )
Posted by Picasa

Tuesday, November 15, 2011

PTT #42- Give thanks!

Posted by Picasa

Hi friends!  Time for another Party Time Tuesdays challenge!  With Thanksgiving right around the corner, the theme for this week is thank you/giving thanks using this sketch:


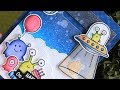
I pulled out lots of scraps from my Thanksgiving supplies and used a favorite image from The Cat's Pajamas.  My little penguin friend can hold a few different things, but I went with the obvious turkey choice.  ;)  I colored the image with my Copics and die-cut it with my Nestabilities.  The sentiment is also TCP and I used my Viva Decor pearl pen to add a touch of embellishment.  This week we have some really AWESOME sponsors, check 'em out:

Our sponsors this week are:
VIVA DECOR
Viva Decor
Viva Decor world headquarters and production facilities are located in Bad Salzuflen, which is situated in the eastern part of North Rhine-Westphalia, Germany. Here new ideas are born, new products are developed, tried and tested and delivered to the international market. Our wide product range includes colors and modeling materials for home decoration, for product design, and accessories for all types of craft projects. Viva Decor is managed by Ingrid Pott and Andreas Franken. For them creativity and innovation build the basis of the company. They have built Viva's reputation on product quality and reliability, combined with ongoing development and improvement. All viva products are crafted with the customer’s needs in mind. Viva Decor products can be found at craft and art supply retailers throughout the world. All America Supply DBA Viva US is the exclusive US distributor for all Viva products. Viva US provides the Viva Decor product line with domestic US Inventory, shipping, and packaging from our large climate controlled PA warehouse. Viva US provides customer service, support and product education nationwide from our Philadelphia location.
Prize:
2 pearl pens, 2 glitter pens,
and 2 embossing creams
GILLI STAMPS
Gilli
anaRydesign is a design house of scrapbooking and craft products. It is also the home of the ‘Gilli’ line of deep-etched rubber stamps. ‘Gilli’ is a collection of rubber stamps for you to make your own. Endless creativity is in your hands! Bring Gilli with you on your journey into the imaginative and artistic world of paper crafts and let her join in on the fun!
Prize:
Gilli Goodie Bag

STITCHY THE BEAR
SBS Store Logo Graphic for display only
Hi my name is Stitchy and I am Co-Owner of Stitchy Bear Stamps...we started this store April 1st, No Fooling haha..I live in upstate New York with my husband and two TEENAGE adults haha, I do say that loosely as they think they run the show here, NOT...
I been creating stamps for a little less than a year now and I am totally addicted to the craft..I started about 4 years ago making digital scraps and I knew there was much more out there, so a friend of mine introduced me to digital stamps...and the rest they say is history...I look forward to seeing all the beautiful creations come through...good luck everyone..stitchy xoxox"
Prize:
10 USD GC graphic for display only


Thanks so much for stopping by!
-Suzanne :O )


Wednesday, November 9, 2011

Halloween doormats

Hi there!  I didn't get this post up as soon as I'd wanted to, but it's the last of my Halloween entries for this year.  I usually get my co-workers a small little something for each major holiday... candy, notepads, candles, you get the idea.  Well, this year, I gave them a big something!  :)  Last December, I had spotted these doormats on clearance at Kohl's.  Originally $17.99, I scooped them up for $3 and change.  I kept them in my closet all year and when October rolled around, I had some regrets about buying such a large item for a small occasion.  I didn't know how I was going to wrap them (or even carry them in to the office, for that matter!).  As luck would have it, I had been at a yard sale recently and came across a short roll of Halloween cellophane (I got the brand-new roll and a small basket for 35 cents!  :D).  I wasn't sure I would have enough wrapping, but for 35 cents, I didn't care if it was a waste!  Sure enough, after rolling the mats and securing them with some heavy-duty twine, the cellophane was just long enough to wrap all 3 mats.  Plus, I got rid of the whole roll in one shot- LOVE not having to keep clutter like that around!  :)  I tied the cellophane off with some super wide ribbon I had in my stash and attached a cute little tag to each gift.


I found the tag die when I was shopping at The Ink Pad (SUPER cool store in NYC... it's crammed with so much stamping/scrapbooking stuff you literally have a tough time walking around to shop!).  It's made by My Favorite Things, but since I don't have a LSS near me, it's tough to find brands like that unless I shop online, which I don't prefer doing.  I was so stoked to find it at The Ink Pad!  :D  Anyway, I die-cut 3 different tags from scraps of patterned paper and stamped "To:" from the coordinating MFT stamp set.  The chipboard pieces are all by Melissa Frances, and I covered them with Doodlebug Sugar Coating.  I wish I had colored the chipboard before adding the glitter because you can see the white base through the glitter, but I just wrote that off as a lesson learned.  :)  You can see each of the tags individually below.  I hope you like my little gifts, belated as my post is!  Thanks so much for stopping by!


-Suzanne :O )


Posted by Picasa

Tuesday, November 8, 2011

PTT #41- Bling!


Hi everyone!  Welcome to another Party Time Tuesdays challenge!  This week:  BLING!  To start my card off, I colored this adorable Sparkle Creations (Caroling Josh) image with my Copics and added a whole bunch of dots to the border with my Viva Decor Pearl Pen in Light Blue.  Next, I used up a handful of scraps from my Christmas stash in colors that matched Joshua's outfit.  I had originally planned to use a lot more of that vintage piano music paper (it really IS vintage!  I got it at a thrift store, and I didn't have to ink it up at all to give it that aged look!  yay!), but I ended up using just a bit of it to make a small embellishment to fill that empty space.  I punched out a circle, and then, to mimic the holly on his book, I used some leaves found in my stash and added two red gems.  I know the leaves aren't exactly holly-like, but it's close enough for me!  :)  To finish off my card, I added two more gems a little bigger in size to balance out the card.


I hope you'll have a minute to play along with us, using "bling" is so much fun, especially for holiday cards!  Link up here:


PTT #41


Thanks so much for stopping by!
-Suzanne :O )  
Posted by Picasa

Sunday, November 6, 2011

Halloween Cards 2011


Hi there!  I'm a little behind on posting my Halloween cards for this year because of the snow storm that hit last weekend.  I had planned to share these cards ON Halloween, but of course my power was out and it always takes me a while to get back into my routine!  Anyway, this year, I didn't have much time to devote to making cards as I've been working like a madwoman for the past month or so to get  merchandise ready for my upcoming craft fairs.  To make things easy on myself, I used this set of papers my co-worker gave me a couple of years ago: each paper had the border frames and images that I had to cut out myself.  I used bits and pieces of patterned paper scraps and random embellishments, but mostly these cards are made from the original paper set. I hope you like my fast-and-easy cards!  Stay tuned tomorrow to see what gifts I gave to my co-workers!


-Suzanne :O )


Related Posts Plugin for WordPress, Blogger...